
CV Joint Repair- For Scirocco 16V
Page 1 of 1
![]()
 CV Joint Repair- For Scirocco 16V
![]() by LhYnxz Sun Mar 09, 2008 10:50 am
by LhYnxz Sun Mar 09, 2008 10:50 am
CV Joint Repair
For Scirocco 16V
CV joints have a reputation of being very difficult to work on. While this may be true for other makes (I've heard that Ford makes a particularly nasty joint), maintaining and/or replacing the joints for an A1 chassis VW is fairly straightforward. I'm going to detail the process I went through on July 25-26, 1998 with my '88 Scirocco 16V. My driver's side outer CV boot was ripped, almost in half, and had been that way for quite a while. At high speeds, I was beginning to notice a slight knocking when turning to the left, so I figured the joint probably needed to be replaced (note that knocking isn't necessarily indicative of CV joint failure, but in my case it was pretty obvious considering how long I'd driven with a ripped boot...) In addition to replacing the outer joint and boot, I went ahead and replaced the other three boots and repacked all the joints. It was the first time I'd done this job, and though it was long and messy, I'm glad I did it (mostly for the $350 I saved in labor fees). The job took all weekend, but remember that is was my first time and I did all four joints (plus my inner tie rod boot, but that's another story).
Also note that while this procedure is outlined for an '88 Scirocco, the method should be almost exactly the same for other A1 chassis VWs. Check your manual first.
TOOLS

One of the most important things about this job is having the right tools. Pictured above are some of the more specialized tools you'll need for this job.
Not pictured, but also important: Grease rags, paper towels, shop manual (e.g. Bentley), and the usual assortment of tools. I also bought a special pair of pliers to crimp the outer boot clamps (called "CV Joint Boot Pliers" strangely enough) - it was around $20.
PARTS

I got my parts locally from Bow Wow (AKA Autovice) in Lynnwood, WA. The outer joint kits were made by Lobro, the inners by Meistersatz. All the kits include boots, circlips, and the proper amount of grease.
Step 1: Loosen Axle Nut
Once you've got all your parts and tools together, and your car parked on a good, level working surface, it's time to begin. Remember to set your emergency brake and block the rear wheels. The first thing we'll do, BEFORE jacking the front end up, is to loosen the axle nut and lug nuts. Note that if you're doing CV joints on both sides, just follow these procedures in parallel (i.e. as you go along) for the other side as well.

The caption for the photo above could read "Necessity is the mother of invention", or even better, "Yet another use for our beloved Bentley manual"... This crazy setup is how I got my axle nuts loose. With the car on the ground remove your front wheel's center cap. This will expose the axle nut. Get out your big ol' breaker bar and 30mm socket (with extension if you need it to clear the wheel). To get the most bang for the buck, you will want to support the socket from beneath. I put the can of carburetor cleaner on the ground, with the Bentley on top of it, then my plastic head hammer on top of that. It just so happened that this pile of stuff was just the right height to support my socket's extension. Chances are you'll also need a cheater bar of some sort - I used a fiberglass windsurfer mast because I didn't have anything better . Hopefully you'll be able to loosen the nut without breaking anything in the process.
Next, loosen the wheel's lug nuts, but do not remove the wheel. Now you can jack the front end up. Do it one side at a time, and put jackstands in the proper places (under the frame just behind the wheel well).
Step 2: Remove inner CV joint from transaxle
Now's the time to grab a light (if you need it), and crawl under the car with your socket and triple square in hand.
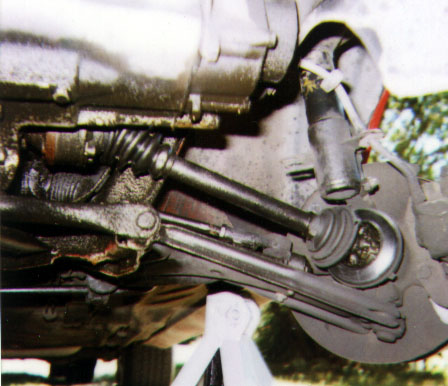
This photo shows my driver's side drive shaft before the operation. Note the ripped outer CV joint boot. Yuck! Also note that even though my wheel is off in this photo, I ended up putting it right back on a short while later.
Take a look at your inner CV joint. You will see a bunch of those triple square bolts on it - these are what hold the joint (and the shaft itself) to the final drive of the tranny. Now's the time to remove them. You'll find that there is just one "sweet spot" for you to get your socket wrench up there and onto a bolt. That's why the wheel is still on there. With the gear in neutral, you can grab the wheel and rotate it until a new bolt moves into the place where you can get to it. If the bolts are tight (which they should be), you'll also need to either have someone step on the brake to keep the axle from spinning, or you can sort of wedge your body against the tire. The driver's side seemed a little easier to work on, because there's a bit more room.
Once all the bolts are off, you can grab the whole joint and move it clear of the final drive. In my case, the final drive flange seal had come loose, so the whole joint was full of tranny fluid instead of grease! I don't know whether it was because of that, but the inner hub of the joint fell out along with all the bearings once I had pulled it free of the tranny. If that happens, just put the pieces in the parts cleaner because you'll need to regrease that joint anyway.
For Scirocco 16V
CV joints have a reputation of being very difficult to work on. While this may be true for other makes (I've heard that Ford makes a particularly nasty joint), maintaining and/or replacing the joints for an A1 chassis VW is fairly straightforward. I'm going to detail the process I went through on July 25-26, 1998 with my '88 Scirocco 16V. My driver's side outer CV boot was ripped, almost in half, and had been that way for quite a while. At high speeds, I was beginning to notice a slight knocking when turning to the left, so I figured the joint probably needed to be replaced (note that knocking isn't necessarily indicative of CV joint failure, but in my case it was pretty obvious considering how long I'd driven with a ripped boot...) In addition to replacing the outer joint and boot, I went ahead and replaced the other three boots and repacked all the joints. It was the first time I'd done this job, and though it was long and messy, I'm glad I did it (mostly for the $350 I saved in labor fees). The job took all weekend, but remember that is was my first time and I did all four joints (plus my inner tie rod boot, but that's another story).
Also note that while this procedure is outlined for an '88 Scirocco, the method should be almost exactly the same for other A1 chassis VWs. Check your manual first.
TOOLS
One of the most important things about this job is having the right tools. Pictured above are some of the more specialized tools you'll need for this job.
| Number | Tool | Price | Description |
| 1 | Gojo Orange Hand Cleaner | $2.99 | Don't laugh - you're going to get VERY greasy |
| 2 | Carburetor/Parts Cleaner | 11.99 | Try to find a can of of cleaner that comes with a dip cage for your parts. |
| 3 | Latex Gloves | 3.59 | The CV joint grease (molybdenum disulfide) is toxic. Better to get the stuff on the gloves than all over your hands and rags. |
| 4 | Engine Degreaser | 1.49 | Getting the hint yet? While you're under there in the innards of the suspension, it's a good idea to clean the whole area up. |
| 5 | 3/4" Breaker Bar with Extension and 30mm Socket | 66.80 (total) | Depending on how tight the last guy torqued your axle nuts this may or may not be overkill. They're supposed to be torqued to 170 ft-lbs, so breaking a bar is a real possibility. Get it from Sears so that if it breaks you can get another for free. |
| 6 | Rubber/Plastic Head Hammer | 11.69 | For tapping the joints on and off the drive shaft. |
| 7 | Gear Puller | 22.49 | This is kind of optional. If the inner joint is stuck on the shaft this could come in real handy for pulling it off without damaging the splines. |
| 8 | Split Ring Pliers | 9.89 | A great tool for removing circlips. |
| 9 | Piston Ring Expander | 6.29 | I used this for putting the inner joint circlip on the drive shaft. The split ring pliers don't quite work for this job. |
| 10 | 8mm Triple Square | 6.99 | This is a tool that you MUST have in order to get the drive shaft off the transaxle. It looks kind of like a torx, except it has 12 points instead of six. DO NOT use an allen key on these bolts. They're torqued fairly tight, and if you strip them then you've got a real nightmare to deal with. |
| 11 | Full Sail Amber | 5.49 (six-pack) | Helps the creative thinking process and doubles as a throat lubricant |
Not pictured, but also important: Grease rags, paper towels, shop manual (e.g. Bentley), and the usual assortment of tools. I also bought a special pair of pliers to crimp the outer boot clamps (called "CV Joint Boot Pliers" strangely enough) - it was around $20.
PARTS
I got my parts locally from Bow Wow (AKA Autovice) in Lynnwood, WA. The outer joint kits were made by Lobro, the inners by Meistersatz. All the kits include boots, circlips, and the proper amount of grease.
| Number | Part | Price | Notes |
| 1 | Outer CV Joint Replacement Kit | $145.00 | Includes new joint, axle nut, boot clamps, and instructions. |
| 2 | Inner CV Joint Boot Kits | 20.00 each | Driver's and passenger side kits are different. Includes gasket and final drive (triple square) bolts. |
| 3 | Outer CV Joint Boot Kit | 15.00 | Includes axle nut, boot clamps, and instructions. |
| 4 | Final Drive Flange Seals | 2.95 each | It's fairly common for these seals to fail. If that happens, tranny fluid will leak into your inner CV joint and dilute the grease. Since they're cheap, it's a good idea to have replacements just in case. |
Step 1: Loosen Axle Nut
Once you've got all your parts and tools together, and your car parked on a good, level working surface, it's time to begin. Remember to set your emergency brake and block the rear wheels. The first thing we'll do, BEFORE jacking the front end up, is to loosen the axle nut and lug nuts. Note that if you're doing CV joints on both sides, just follow these procedures in parallel (i.e. as you go along) for the other side as well.
The caption for the photo above could read "Necessity is the mother of invention", or even better, "Yet another use for our beloved Bentley manual"... This crazy setup is how I got my axle nuts loose. With the car on the ground remove your front wheel's center cap. This will expose the axle nut. Get out your big ol' breaker bar and 30mm socket (with extension if you need it to clear the wheel). To get the most bang for the buck, you will want to support the socket from beneath. I put the can of carburetor cleaner on the ground, with the Bentley on top of it, then my plastic head hammer on top of that. It just so happened that this pile of stuff was just the right height to support my socket's extension. Chances are you'll also need a cheater bar of some sort - I used a fiberglass windsurfer mast because I didn't have anything better
Next, loosen the wheel's lug nuts, but do not remove the wheel. Now you can jack the front end up. Do it one side at a time, and put jackstands in the proper places (under the frame just behind the wheel well).
Step 2: Remove inner CV joint from transaxle
Now's the time to grab a light (if you need it), and crawl under the car with your socket and triple square in hand.
This photo shows my driver's side drive shaft before the operation. Note the ripped outer CV joint boot. Yuck! Also note that even though my wheel is off in this photo, I ended up putting it right back on a short while later.
Take a look at your inner CV joint. You will see a bunch of those triple square bolts on it - these are what hold the joint (and the shaft itself) to the final drive of the tranny. Now's the time to remove them. You'll find that there is just one "sweet spot" for you to get your socket wrench up there and onto a bolt. That's why the wheel is still on there. With the gear in neutral, you can grab the wheel and rotate it until a new bolt moves into the place where you can get to it. If the bolts are tight (which they should be), you'll also need to either have someone step on the brake to keep the axle from spinning, or you can sort of wedge your body against the tire. The driver's side seemed a little easier to work on, because there's a bit more room.
Once all the bolts are off, you can grab the whole joint and move it clear of the final drive. In my case, the final drive flange seal had come loose, so the whole joint was full of tranny fluid instead of grease! I don't know whether it was because of that, but the inner hub of the joint fell out along with all the bearings once I had pulled it free of the tranny. If that happens, just put the pieces in the parts cleaner because you'll need to regrease that joint anyway.

LhYnxz- Site Administrator

- Number of posts : 485
Age : 44
Location : Bayamon, PR
Reputation : 0
Points : 30
Registration date : 2007-12-01 -

![]()
![]()
![]()

 Similar topics
» Volkswagen Introduces the New Scirocco
» VW Scirocco R20T in the Works
» VW Scirocco GT Gains 170PS TDI Engine in the UK
» VW Presents The Scirocco GT24 At The GTI Meet 2008
» VW Scirocco R20T in the Works
» VW Scirocco GT Gains 170PS TDI Engine in the UK
» VW Presents The Scirocco GT24 At The GTI Meet 2008
Page 1 of 1
Permissions in this forum:
You cannot reply to topics in this forum|
|
|